Winterizing a camper is an essential task to protect your RV from the harsh winter weather.
Not only does it prevent costly repairs, but it also ensures that your camper is ready for the next camping season.
Winterizing a camper involves a series of steps that are easy to follow, even for those who are new to RVing.
Understanding the Basics
Winterizing a camper is an essential process that every RV owner should know how to do. It involves preparing your RV for the winter season by protecting it from the cold weather elements. This process helps prevent damage to your RV’s plumbing system and other components that can be affected by freezing temperatures.
The winterizing process can be broken down into several steps, including draining and cleaning your water tanks, draining your water lines and hot water heater, winterizing your plumbing system, washing out the sewer hose, cleaning out your camper completely, emptying the refrigerator, and unplugging all the electronics.
These steps are necessary to ensure that your RV is protected during the winter season.
When it comes to winterizing your RV, there are two primary methods: using antifreeze or blowing out the water lines. The antifreeze method involves adding a non-toxic RV antifreeze to the water system to prevent the water from freezing. The blowing out method involves using an air compressor to blow out any remaining water from the lines.
Before starting the winterizing process, it’s important to have all the necessary tools and supplies. This includes a non-toxic RV antifreeze, a water pump converter kit, a sewer hose, a bucket, a cleaning solution, and a soft-bristled brush.
It’s also important to follow a winterizing guide to ensure that you don’t miss any steps. Most RV owners’ manuals include a winterizing guide that can be followed. Additionally, there are many online guides available that provide step-by-step instructions on how to winterize your RV.
In conclusion, understanding the basics of winterizing your camper is crucial to protect your RV from the harsh winter weather. By following a winterizing guide and using the proper tools and supplies, you can ensure that your RV is ready for the next camping season.
Preparing for Winterization
Before beginning the winterization process, it is important to gather all necessary supplies and check the owner’s manual for specific instructions on winterizing the camper.
Gathering Necessary Supplies
To properly winterize a camper, it is important to have the following supplies:
Antifreeze
Siphoning kit
Screwdriver
Air compressor
Cordless power drill
Square tip driver bit
Needle nose pliers
It is also recommended to have a checklist to ensure that all necessary steps are taken during the winterization process.
Checking the Owner’s Manual
Every camper is different, so it is important to check the owner’s manual for specific instructions on how to winterize the camper. The manual will provide information on the type of antifreeze to use, how to properly drain the water system, and any other unique steps that need to be taken for that particular camper.
It is important to follow the instructions in the owner’s manual carefully to avoid damaging the camper or its components. If the manual is not available, contact the manufacturer or a certified technician for guidance.
By gathering the necessary supplies and checking the owner’s manual, campers can properly prepare for the winterization process and ensure that their camper is protected during the colder months.
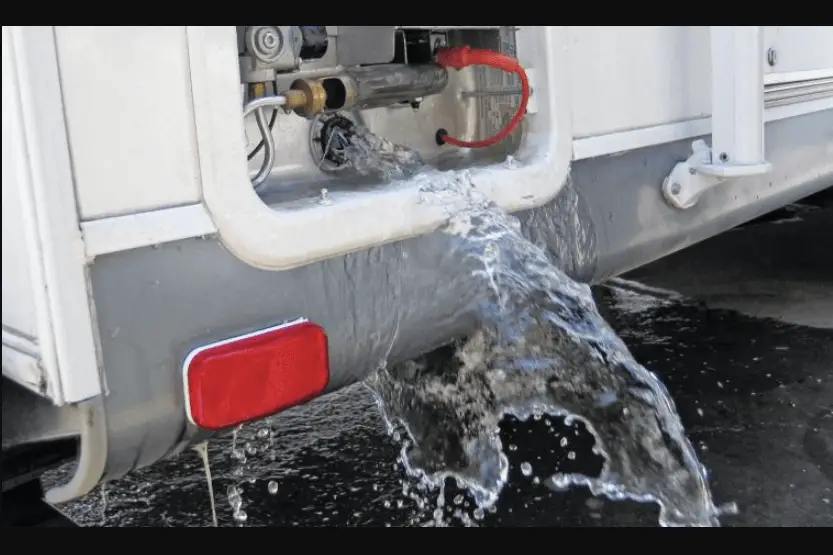
Draining the Water System
Before winterizing a camper, it’s important to drain the water system to prevent any water from freezing and causing damage to the pipes and fixtures. The following sub-sections explain how to empty the fresh water tank, drain the gray and black water tanks, and remove water from the plumbing.
Emptying the Fresh Water Tank
To empty the fresh water tank, turn off the water pump and open all the faucets to release the pressure. Next, locate the drain valve on the bottom of the tank and open it to let the water flow out. If the camper has a low-point drain, open it to drain any remaining water from the system. Once the tank is empty, close the drain valve and low-point drain.
Draining the Gray and Black Water Tanks
To drain the gray and black water tanks, locate the valves on the underside of the camper and open them. Use a hose to flush out any remaining waste and debris from the tanks. Once the tanks are empty, close the valves.
Removing Water from Plumbing
To remove water from the plumbing, turn on all the faucets and let them run until no more water comes out. Next, locate the water pump and disconnect the inlet and outlet lines. Use a compressed air system to blow air through the lines and remove any remaining water. Finally, remove the drain plug on the water heater and let it drain completely.
By following these steps, the camper’s water system will be properly drained and ready for winterization.
Bypassing the Water Heater
Winterizing a camper involves a lot of steps, but one of the most important is bypassing the water heater. This process ensures that antifreeze doesn’t enter the water heater and damage it during the winter months. Here’s what you need to know about bypassing the water heater in your camper.
Understanding the Bypass Process
To bypass the water heater, you’ll need a water heater bypass kit. This kit typically includes three valves that allow you to redirect the flow of water around the water heater. The valves are usually located near the water heater, behind an access panel.
To begin the bypass process, turn off the water supply to the camper and open a faucet to relieve any pressure in the system. Then, locate the water heater and remove the access panel. You should see the three valves that make up the bypass kit.
The first valve is the inlet valve, which controls the flow of water into the water heater. The second valve is the outlet valve, which controls the flow of water out of the water heater. The third valve is the bypass valve, which allows you to redirect the flow of water around the water heater.
Implementing the Bypass Kit
To bypass the water heater, you’ll need to close the inlet and outlet valves and open the bypass valve. This will allow water to flow around the water heater and prevent antifreeze from entering it.
Once the valves are set correctly, turn on the water supply to the camper and run water through all the faucets until you see antifreeze. This will ensure that all the water lines are filled with antifreeze and protected from freezing.
It’s important to note that some water heaters have a pressure relief valve that needs to be opened during the bypass process. This valve is typically located near the top of the water heater and should be opened to allow air to escape.
Bypassing the water heater is an important step in winterizing your camper. With a water heater bypass kit and a little know-how, you can protect your water heater and your entire plumbing system from damage during the winter months.
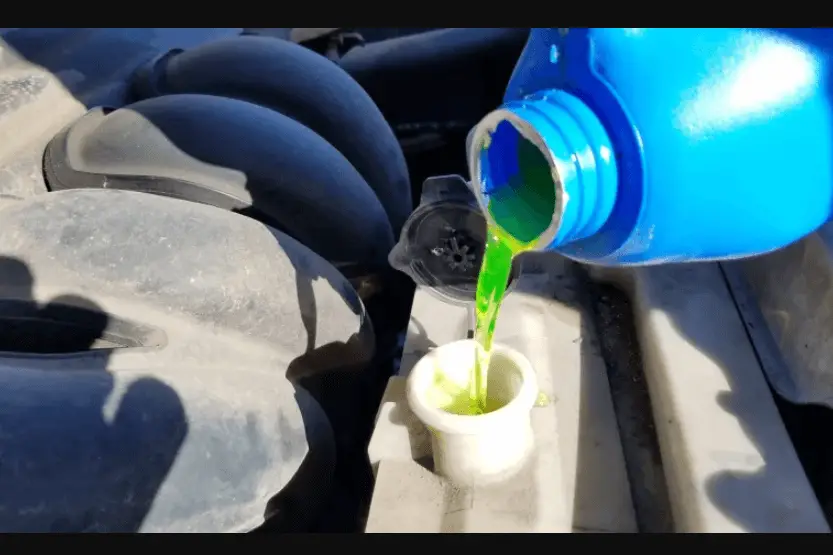
Adding Antifreeze
When it comes to winterizing a camper, adding antifreeze is an essential step to protect the plumbing system from damage due to freezing temperatures. In this section, we will cover the two main sub-sections of adding antifreeze: choosing the right antifreeze and applying antifreeze to the system.
Choosing the Right Antifreeze
The first step in adding antifreeze to your camper is to choose the right type of antifreeze. It is essential to use RV antifreeze specifically designed for use in recreational vehicles. Regular automotive antifreeze is not suitable for RV plumbing systems and can cause damage.
RV antifreeze comes in two types: ethylene glycol and propylene glycol. Ethylene glycol antifreeze is toxic and should never be used in an RV plumbing system. Propylene glycol antifreeze is non-toxic and safe for use in RV plumbing systems. It is also more expensive than ethylene glycol antifreeze.
When choosing antifreeze, make sure to check the label to ensure it is safe for use in potable water systems. Also, make sure to purchase enough antifreeze to complete the winterization process.
Applying Antifreeze to the System
Once you have chosen the right antifreeze, the next step is to apply it to the plumbing system. Here are the steps to follow:
Drain the fresh water tank and all of the water lines in the camper.
Install a water pump converter kit to draw antifreeze from a container into the system.
Turn on the water pump and open all of the faucets, including the hot water faucet, until antifreeze flows out.
Flush the toilet until antifreeze flows into the bowl and down the drain.
Pour antifreeze down each drain, including the shower, sink, and toilet.
Make sure to pour enough antifreeze down each drain to fill the P-traps.
Turn off the water pump and close all of the faucets.
By following these steps, you can ensure that your camper’s plumbing system is protected from damage due to freezing temperatures during the winter months.
Cleaning and Protecting the Interior
When winterizing a camper, it’s important to not only protect the plumbing system but also to clean and protect the interior to prevent the build-up of bacteria and pests. Here are some steps to follow to ensure the interior of your camper stays clean and protected during the winter months.
Removing Food and Moisture
Before winterizing your camper, it’s important to remove all food and moisture from the interior. Any leftover food or crumbs can attract pests, while moisture can lead to mold growth. Start by removing all food from the refrigerator and pantry. Clean the refrigerator and allow it to dry completely before closing it up for the winter.
Next, remove all bedding, linens, and curtains from the camper. Wash and dry them thoroughly before storing them in airtight containers. This will prevent moisture and pests from getting to them during the winter months.
Preventing Pest Infestation
Pests can be a major problem in a camper during the winter months. To prevent infestations, it’s important to take some preventative measures. Start by thoroughly cleaning the interior of the camper. Use a cleaning wand to reach all the nooks and crannies, including under furniture and appliances.
Next, seal up any cracks or holes in the camper where pests could enter. This includes gaps around windows and doors, as well as any holes in the walls or floors. Consider using mouse traps or repellents to further deter pests.
By following these steps, you can ensure that the interior of your camper stays clean and protected during the winter months.
Securing the Exterior
When winterizing a camper, securing the exterior is just as important as preparing the interior. This section will cover two sub-sections: Checking the Battery and Power Supply, and Protecting the Exterior from Weather Conditions.
Checking the Battery and Power Supply
Before storing the camper, it is essential to check the battery and power supply. Leaving the battery in a frozen state can damage it beyond repair. The first step is to disconnect the battery from the camper. Next, clean the battery terminals and apply a protective coating to prevent corrosion. Store the battery in a warm and dry place, like a garage or basement.
To protect the power supply, ensure that all electrical appliances and systems are turned off. This step includes disconnecting the power supply from the camper. If the camper has a converter, switch it off to prevent it from draining the battery.
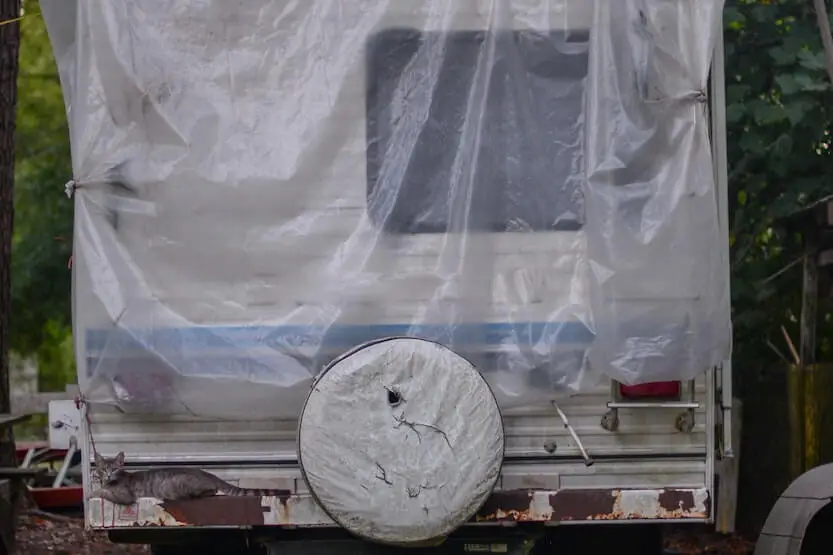
Protecting the Exterior from Weather Conditions
The exterior of the camper also needs protection from the harsh winter conditions. Here are some steps to follow:
Clean the camper’s exterior thoroughly and remove any debris, dirt, or grime. This step helps prevent mold and mildew growth during storage.
Apply a protective coating to the camper’s exterior to prevent rust and corrosion. This step is especially important if the camper will be stored outside.
Cover the camper with a waterproof and breathable cover. This step helps prevent moisture buildup and protects the camper from snow, ice, and other winter conditions.
Inspect the camper’s roof and seal any cracks or leaks. This step will prevent water from seeping into the camper and causing damage.
Place rodent repellent around the exterior of the camper to keep away rodents. Inspect the camper’s entire exterior for possible entry points, including underbelly and exterior storage compartments.
By following these steps, campers can protect their travel trailers during the winter months.
Post-Winterization Steps
After completing the winterization process, there are a few post-winterization steps that camper owners should take to ensure their vehicle is ready for spring usage. These steps involve dealing with potential damage and preparing the camper for regular use.
Dealing with Potential Damage
Even with proper winterization, campers can still sustain damage during the winter months. Some common issues include water damage from frozen pipes that burst, and moisture buildup that can lead to mold and mildew growth. It’s important to inspect the camper thoroughly for any signs of damage before using it again.
If any damage is found, it’s best to address it immediately to prevent further issues down the line. For example, if there is water damage, it’s important to dry out the affected area thoroughly and make any necessary repairs. If there is mold or mildew growth, it’s important to address the root cause of the moisture and clean the affected area with a mold and mildew remover.
Preparing for Spring Usage
Once any potential damage has been addressed, it’s time to prepare the camper for regular use. This involves removing any protective coverings that were put in place during winterization, and checking all systems to ensure they are functioning properly.
One important system to check is the plumbing system. It’s important to run water through all faucets and fixtures to ensure there are no leaks or other issues. It’s also a good idea to sanitize the water system to ensure it’s free of any bacteria or other contaminants that may have accumulated during winterization.
Another important system to check is the electrical system. It’s important to ensure all lights, appliances, and other electrical components are functioning properly. It’s also a good idea to check the battery to ensure it’s fully charged and ready for use.
In addition to checking systems, it’s also a good idea to give the camper a thorough cleaning. This involves cleaning all surfaces, including floors, walls, and countertops, and removing any debris or other items that may have accumulated during winterization.
By following these post-winterization steps, camper owners can ensure their vehicle is ready for spring usage and minimize the risk of any issues arising.
To Summarize
Winterizing a camper is an essential task that every camper owner should perform before storing their vehicle for the winter season. The process involves protecting the plumbing system, water lines, and tanks from freezing temperatures that can cause significant damage and costly repairs.
To winterize a camper, the owner must follow a series of steps that include draining the water system, adding antifreeze, and protecting the tires, battery, and other components from the harsh winter weather. The following are the essential steps to winterize a camper:
Drain the water system: This involves draining the fresh water tanks, water heater, and all the water lines. The owner should also open all the faucets, showerheads, and valves to remove any remaining water from the system.
Add antifreeze: After draining the water system, the owner should add antifreeze to the plumbing system to protect it from freezing temperatures. The antifreeze should be non-toxic and specifically designed for RVs.
Protect the tires: The owner should inflate the tires to the recommended pressure and cover them with tire covers to protect them from the winter weather.
Protect the battery: The owner should remove the battery and store it in a warm and dry place. The battery should be fully charged and disconnected from the camper.
Protect other components: The owner should protect other components, such as the propane tanks, refrigerator, and air conditioner, from the winter weather by covering them with protective covers.
By following these steps, the owner can ensure that their camper is properly winterized and protected from the harsh winter weather. This will help prevent costly repairs and ensure that the camper is ready to use when the camping season starts again.
We created RVcrown.com in 2020 as a way to geek about everything we’ve learned and are still learning about RVs. You’ll find in-depth articles covering reviews, specs, and features of the top RVs in the market. Contact me. Disclaimer: The information and advice provided in this blog are for educational and informational purposes only. The author does not guarantee any particular result or outcome from following the advice provided. See more about us.